Hyderabadi Dum Biryani is a rich and flavorful dish known for its aromatic spices and slow-cooked layers of rice and meat. This traditional recipe has been passed down through generations and remains a favorite among food lovers worldwide.
Many can’t replicate its true taste at home. The secret lies in proper marination, careful layering, and slow cooking.
Whatever the secret is today you’re going to an expert of Hyderabadi Dum Biryani. Yes! Below, I’m sharing the perfect recipe along with expert tips and tricks to follow, avoid common mistakes and even suggest serving options.
Read on for its royal origins before getting into the perfect recipe.
List of Ingredients Required For Hyderabadi Chicken Dum Biryani Recipe
Hyderabadi Dum Biryani is known for its rich aroma and deep flavors. The key to its taste lies in the right mix of ingredients. Below are the essential ingredients you need:
- 2 cups Basmati rice
- 500g chicken or mutton
- 1 cup yogurt
- 2 onions (thinly sliced)
- 2 tomatoes (chopped)
- 2 tablespoons ghee
- 1 teaspoon ginger-garlic paste
- 1 teaspoon garam masala
- 1 teaspoon turmeric powder
- 1 teaspoon red chili powder
- 1 teaspoon cumin seeds
- 4 green cardamoms
- 2 cloves
- 1 bay leaf
- 1 cinnamon stick
- ½ cup chopped coriander leaves
- ½ cup mint leaves
- 1 teaspoon saffron (soaked in warm milk)
- 1 teaspoon kewra water
- Salt to taste
- Water as required
Secret Ingredients
A few special ingredients take the biryani to the next level:
- Ghee-Infused Onions – Slow-cooked onions in ghee add a caramelized taste.
- Kewra Water & Rose Water – Enhances aroma and gives an authentic touch.
- Yogurt & Lemon Juice – Helps tenderize the meat and balance the spices.
- Surprising Flavor Combinations – Just like the unique blend of Chocolate Covered Potato Chips, where sweet and salty create an unexpected delight, Hyderabadi Dum Biryani also thrives on a balance of rich spices, creamy textures, and fragrant elements.
Step-by-Step Guide to Making Hyderabadi Dum Biryani
Hyderabadi Dum Biryani requires patience and precision. Each step matters, from marination to dum cooking. Here’s a foolproof way to make an authentic version with pro tips for perfection.
Step 1: Preparing the Rice
- Rinse the basmati rice in cold water until the water runs clear.
- Soak the rice for 30 minutes.
- Boil water in a large pot, add salt, and cook the rice until it’s 70% done.
- Drain the water and set the rice aside.
Step 2: Marinating the Meat
- In a large bowl, mix the chicken or mutton with yogurt, ginger-garlic paste, red chili powder, turmeric, and salt.
- Add half of the chopped coriander and mint leaves.
- Let it marinate for at least 2 hours (overnight for best results). For more insights on marination techniques, visit The Institute of Food Technologists (IFT).
Step 3: Preparing the Masala
- Heat ghee in a deep pan and fry the sliced onions until golden brown.
- Add cumin seeds, bay leaf, cinnamon, cloves, and cardamoms.
- Stir in chopped tomatoes and cook until they soften.
- Add the marinated meat and cook until it’s tender and aromatic.
Step 4: Layering the Biryani
- In a heavy-bottomed pot, spread a layer of cooked rice.
- Add a layer of cooked meat masala.
- Sprinkle chopped mint, coriander, saffron milk, and kewra water.
- Repeat the layering process until all rice and meat are used.
- Cover the pot with a tight lid and cook on low heat (Dum) for 25-30 minutes.
Step 5: Serving the Biryani
- Gently mix the biryani before serving to ensure even flavors.
- Serve hot with raita or salad.
Gas Stove vs. Oven vs. Traditional Wood Fire – Which Works Best?
- Gas Stove: Place the pot on low flame for 30-40 minutes.
- Oven: Bake at 180°C (350°F) for 40 minutes.
- Wood Fire: Gives the best smoky flavor but needs careful heat control.
How Long to Cook on Dum for Soft, Juicy Meat?
- Chicken: 30-35 minutes on low flame.
- Mutton: 40-50 minutes for full tenderness.
This is how you create a perfect Hyderabadi Dum Biryani. Would you like me to continue with the next section?
Pro Tips to Make Restaurant-Style Hyderabadi Dum Biryani at Home
Even home-cooked biryani can taste just like the one from top restaurants. The secret lies in expert techniques that enhance flavor, texture, and aroma.
The Right Way to Use Fried Onions for Maximum Flavor
Fried onions, or birista, add depth to the biryani. They should be crispy, golden-brown, and slightly sweet. Here’s how to get them right:
- Use Thinly Sliced Onions – Thick slices don’t crisp well.
- Fry on Medium Heat – High heat burns them; low heat makes them soggy.
- Drain Excess Oil – Place them on a paper towel to stay crispy.
- Use for Layering & Marination – Mix some into the marinade for extra taste.
Tip: Store-bought fried onions lack freshness. Always make them at home for better results.
How Much Water-to-Rice Ratio for Fluffy Grains
The perfect water-to-rice ratio ensures that the grains remain separate. Follow these guidelines:
- For Basmati Rice: Use 1.5 cups of water per cup of rice.
- For Sona Masuri Rice: Use 2 cups of water per cup of rice.
- For Partially Cooked Rice (70% Doneness): Boil with extra water and drain when grains are firm but not fully soft.
Tip: Adding 1 teaspoon of oil or ghee to boiling water prevents sticking.
Secret Biryani Layering Technique Used by Chefs
Top chefs follow a 3-layer method for the best balance of flavors:
- First Layer: Marinated meat at the bottom with some fried onions.
- Second Layer: 50% of the cooked rice with saffron-infused milk.
- Third Layer: The remaining rice, garnished with mint, ghee, and fried onions.
Chef’s Trick: Do not press down on the rice while layering. This keeps it light and fluffy.
Common Mistakes to Avoid
Many people struggle to get the perfect Hyderabadi Dum Biryani. Here’s how to fix common issues:
Mistake#1: Cooking rice completely before layering
Fix: Boil rice only until 70% cooked, then drain immediately.
Mistake #2: Using too much water
Fix: Stick to the right water-to-rice ratio and always drain excess water.
Mistake#3: Placing the biryani pot directly on high flame
Fix: Use a thick-bottomed pan or place a tava (griddle) underneath for even heat distribution.
Mistake#4: Not using enough moisture in the bottom layer
Fix: Add a little yogurt or ghee at the base before adding marinated meat.
Mistake#5: Marinating for too short a time
Fix: Always marinate for at least 2-4 hours (overnight for mutton).
Mistake#6: Cooking on high heat, which seals the chicken before absorbing flavors
Fix: Always start cooking on low heat to let the spices infuse deeply.
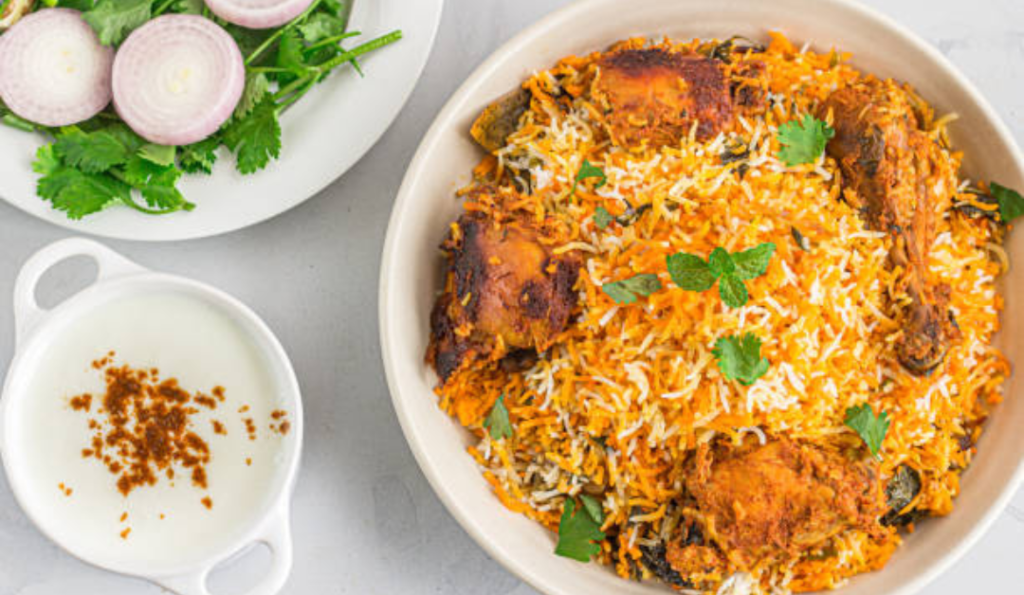
Serving & Presentation
Hyderabadi Dum Biryani is not just about taste—it’s also about presentation. The right side dishes, plating techniques, and storage methods make a big difference.
Best Side Dishes to Serve with Hyderabadi Biryani
A great biryani deserves the perfect accompaniments. Here are the best traditional side dishes
- Raita – A cooling yogurt-based side dish that balances the rich flavors of biryani. Try:
- Onion Raita – Sliced onions, green chilies, and cumin in yogurt.
- Boondi Raita – Tiny fried gram flour balls in spiced yogurt.
- Mirchi Ka Salan – A spicy, tangy gravy made with green chilies, peanuts, and tamarind. A must-have with Hyderabadi biryani!
- Baingan Ka Salan – A rich, nutty eggplant curry that adds depth to every bite.
How to Plate Biryani Like a Pro (For Instagram-Worthy Presentation)
Plating biryani well makes it more appetizing. Here’s how:
- Use a Wide Plate – A flat serving dish allows better layering than deep bowls.
- Scoop Gently – Use a wide spatula to lift biryani without breaking the grains.
- Garnish Like a Chef – Sprinkle fried onions, chopped coriander, and saffron milk on top.
- Add a Side of Raita & Salan – Arrange them in small bowls for contrast.
- Place a Copper or Brass Handi – Traditional utensils make the dish look authentic.
Always serve biryani hot—this keeps the aroma fresh and inviting.
Storing & Reheating Leftovers Without Losing Flavor
Biryani tastes even better the next day—if stored right!
Storage Tips:
- Cool Before Storing – Let biryani come to room temperature before refrigerating.
- Use an Airtight Container – Prevents drying out and absorbing fridge odors.
- Store in Portions – This avoids reheating the entire batch multiple times.
Reheating Methods:
- Steaming Method – Place biryani in a steamer for 5 minutes to revive moisture.
- Stovetop Method – Sprinkle 2 tbsp of water, cover, and heat on low flame.
- Microwave Method – Cover biryani with a damp paper towel and heat for 2 minutes.
Never reheat biryani on high heat—this dries out the rice.
Hyderabadi Dum Biryani Variations
Hyderabadi Biryani has many versions beyond just chicken. Let’s explore the best ones.
Hyderabadi Chicken Dum Biryani vs. Mutton Dum Biryani
Both are delicious, but here’s how they differ:
Mutton Dum Biryani
- Uses tender goat meat, marinated overnight.
- Requires longer cooking time for juicy, soft meat.
- Has a richer, deeper flavor.
Chicken Dum Biryani
- Cooks faster and is easier to make.
- Has a lighter taste compared to mutton.
- Ideal for those who prefer milder flavors.
Vegetarian Hyderabadi Biryani – Same Taste, No Meat!
You don’t need meat to enjoy Hyderabadi Biryani! Try these plant-based options:
- Paneer Biryani – Soft paneer cubes absorb spices beautifully.
- Mushroom Biryani – Mushrooms add a rich, umami taste.
- Jackfruit Biryani – A great meat substitute with a similar texture.
To achieve the best flavor, marinate vegetables similar to meat.
Instant Pot & One-Pot Pressure Cooker Version (Good for Fast Cooking)
Want biryani in under 45 minutes? Try these quick methods:
Instant Pot Method
- Sauté onions and spices using Sauté mode.
- Add the marinated meat; cook for 5 minutes.
- Add partially cooked rice, spread saffron milk on this.
- Seal and cook at High Pressure for 6 minutes, and steam release naturally.
One-Pot Pressure Cooker System
- Sauté diced onions and spices in a pressure cooker.
- Add your marinated meat and cook for one whistle on high.
- Grease Meghalaya, add water, cook for two whistles.
Tip: Use water just to cover the rice when pressure cooking (1 cup rice = 1.25 cups water), otherwise the biryani will be mushy.
FAQs About Hyderabadi Dum Biryani
Hyderabadi Dum Biryani is a royal dish prepared with rich flavors and unique cooking method. Here are a few common queries on Hyderabadi Dum Biryani with expert answers:
What makes Hyderabadi Dum Biryani unique?
Hyderabadi Dum Biryani is unique because of its slow-cooking “Dum” method, allowing flavors to blend perfectly. Key features include:
- Raw marinated meat layered with half-cooked rice ensures deep flavor absorption.
- Aromatic ingredients like saffron, fried onions, ghee, and kewra water add richness.
- Balanced spice levels provide flavor without being overwhelmingly spicy.
Can I prepare biryani without marinating the chicken/meat?
No, marination is necessary for the tenderness and flavor in the meat. Otherwise, the chicken tastes bland and dry.
For short of time:
- Quick marination by applying the spice rub and yogurt on the chicken and let it rest for 30 minutes at the least.
- Pressure cook the chicken or meat with one whistle along with the marinade before layering the rice.
What’s the best rice for Hyderabadi Dum Biryani?
Long-grain Basmati rice is best because it stays fluffy, absorbs flavors well, and has a natural aroma.
How can I make biryani less spicy?
For a milder taste:
- Reduce green chilies and red chili powder.
- Add more yogurt to balance the heat
- Use fried onions generously to add sweetness
- Serve with raita to cool down the spice.
Can I use regular yogurt instead of curd?
Yes, Greek yogurt or thick plain yogurt works well as a substitute for curd. If using regular yogurt:
- Strain excess water by placing it in a muslin cloth for 30 minutes4.
- Use slightly less yogurt than curd to avoid making the marinade watery4.
How to get the same smoky flavor without a wood fire?
Replicate the smoky flavor using the dhungar method:
- Take a small piece of hot charcoal and place it in a metal bowl.
- Drizzle drops of ghee on the coal, it sparks the smoke.
- Cover the Biryani pot immediately with the charcoal dish and leave it for 5-7 minutes.
Why you Should Make This Recipe Today
- Free from Artificial Colors or Preservatives — 100% natural flavors!
- Specially Balanced Spices —Adjust according to your likings.
- More Meat, Less Rice — Unlike most restaurants that provide less meat.
- Made From Scratch Each Time — Unlike many restaurants, no reheated leftovers.
When you make biryani yourself, you make all the choices—from the heat level to the quality of the ingredients.
Key Takeaways for Making Perfect Dum Biryani Every Time
- Marinate the meat for a minimum of 4-6 hours for intense flavor.
- Use aged Basmati rice for the layers but cook only 70% before layering.
- Layer properly — Meat first, then rice, with fried onions and saffron milk in between.
- Cook on Dum (low heat) for 30-40 minutes to allow flavors to meld.
- Seal the pot properly for even steaming — dough works best.
Last Thoughts
This step-by-step guide will help you prepare the Hyderabadi Dum Biryani at home.
Give this a try and let us know how it worked for you. Did you love it? Do you have any secret tips? Let us know in the comments how your experience was!

Hyderabadi Dum Biryani Recipe
Ingredients
- 2 cup Basmati rice (soaked 30 min)
- 500 g Chicken (bone-in preferred)
- 1 cup Yogurt
- 2 Onions (thinly sliced)
- 2 Tomatoes (chopped)
- 1 tbsp Ginger-garlic paste
- 2 tbsp Ghee
- 1 tsp Red chili powder
- 1 tsp Turmeric powder
- 1 tsp Garam masala
- 1 tsp Cumin seeds
- 4 Green cardamoms
- 2 Cloves
- 1 Bay leaf
- 1 Cinnamon stick
- ½ cup Coriander leaves (chopped)
- ½ cup Mint leaves (chopped)
- 1 tsp Kewra water
- Salt to taste
Aromatic Add-ons:
- 1 tsp Saffron (soaked in 3 tbsp warm milk)
- tbsp Lemon juice
- Optional: Rose water (few drops)
Instructions
Step 1: Marinate the Chicken
- Mix chicken with yogurt, ginger-garlic paste, red chili powder, turmeric, salt, coriander, mint, and lemon juice.
Step 2: Prepare the Rice
- Rinse and soak basmati rice for 30 minutes.
- Boil with salt until 70% cooked. Drain and set aside.
Step 3: Cook the Masala
- Heat ghee in a pan, fry onions till golden brown. Reserve half for layering.
- Add cumin, bay leaf, cinnamon, cloves, and cardamoms.
- Stir in chopped tomatoes and cook till soft.
- Add marinated chicken and cook till partially done.
Step 4: Layer the Biryani
- In a heavy-bottomed pot:Bottom Layer: Chicken with some fried onions.
- Middle Layer: Half of the parboiled rice. Drizzle saffron milk and kewra water.
- Top Layer: Remaining rice, mint, coriander, ghee, and remaining fried onions.
Step 5: Dum Cooking (Steaming)
- Seal the pot lid tightly (use dough for best results).
- Cook on low heat (on a tawa or griddle) for:Chicken: 30–35 minsMutton: 40–50 mins
- Rest for 10 mins before opening the lid.
Notes
🍽️ Serving Suggestions
Best Served With:- Onion Raita or Boondi Raita
- Mirchi Ka Salan or Baingan Ka Salan
- Sliced lemons and salad
- Serve in a copper/brass handi for authenticity.
- Garnish with fried onions, saffron milk, and mint leaves.
1 thought on “Perfect & Authentic Hyderabadi Dum Biryani Recipe”